Simple Complexity Page 3  [Previous][Next][Main]
 

We're ready to start aligning


The fastest, easiest way to align textures is the CONTROL-CLICK method. This is done in the 3D window with it set on Texture With Outline.

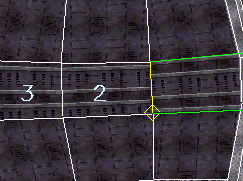
Start by making a face current as shown to the right. 

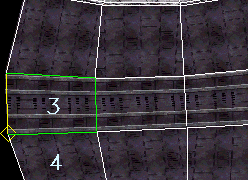
Now hold down CRTL and pick a face that shares an edge with the current.  That face aligns with the current and becomes the current face.

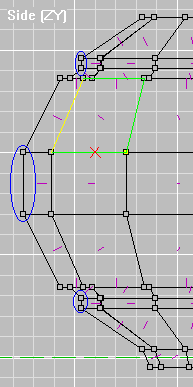
As a side note, you can change textures by using SHIFT and picking a face.  This puts the Current Texture on the texture bar on the face you click on.

Just keep CTRL held down and go from face to face as shown to the left.

Go ahead and do both frames and the walls between them.  Rotate the image so you can get to faces as you need to.  Don't start on the rounded part of the shell or pipes yet.

NAVIGATION HINT:  To rotate the image in the 3D view hold CRTL, pick a point on the image with your left mouse button and drag.  To drag the image around hold SHIFT and drag.


Lathing has an interesting property in relation to texture alignment.  Any face that is parellel with the axis you lathe around are nice and square to each other (circled to the right).  This makes it possible to align them with each other.  You can also align faces that are in a verticle row parellel to the axis.  Once a face is on an angle with the axis you can't align from side to side (well.. you can but you get some strange results).
 

This makes rounded walls and pipes tricky to align.  You really have to think about the order you pick them. With our sphere you want to align the faces going around the center first then work up and down from the center faces.
We're going to concentrate on doing one quarter of the sphere.

Example A

First make the face right center (see below) current and use the Texture Align Box to move it to where I have it.
Now use CTRL-CLICK to align 2 and 3 with it.
Next align the the face below 3. Make 3 current again and align face 5.

Do the other 2 rows by working from the center faces of those rows.


We do pipes similar to what we did above.  Pick one line of faces, align them down the lenght of the pipe,
then go back and work around the rows of segments always starting from the same line.  In our case we're giong to
work from the center out.  We know from Example A which faces will align from side to side.
Make 1 Current, CTRL-CLICK 2
Make 1 Current, CTRL-CLICK 3
Now work up
Make 3 Current, align 4 then 5
Make 1 Current, align 6 then 7
Make 1 Current, align 8 then 9
Oh, and beforeI forget, go back to the wall segment between the frames and align those to.
Make the center face current, work your way down.  Make the center face current, work your way up.

On to the next page.

Back to Papacat's main page