Simple ComplexityPage
2 [Previous][Next][Main]
Now we're going to make the metal frames for sphere. We'll use
Copy, Paste-On-Top and Extrude.
By coping parts of a room and using them as a template for building
other parts we make it easier
when it's time to bring them together.
Sctut02.orf from the zip file picks up here.
 |
First make the TOP window active and change
the grid to 100. Mark the verts as shown to the left and copy.
Choose Paste-On-Top then move the new verts 100 units to the left.
By using Paste-On-Top I know the part will go right into place when it's
ready. A nice big grid puts it out the way to work in one move.
Now move your TOP view to the left so the new verts are visible.
Navigation Hint: Hold down the shift key,
point in the TOP view, hold down the left mouse button and DRAG the view
window. |
| To the right are the new verts. We're going to add
some verts to create faces so we need the reference frame on the same plane.
Set the grid to 5 and move the reference frame to the line by holding ctrl
and picking the line with the mouse. |
 |
 |
Make the Front view active and move to the verts
(shiftl+drag).
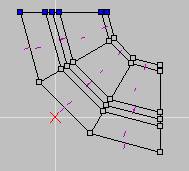
To the left you see unmarked verts. There what we're starting
with. Set the grid to one and insert the verts you see marked to
the left. Instead of using the mouse to move your insertion point
(red cross-hairs) use the arrow keys on the keypad while holding control.
It's easier to be accurate this way.
I circled the verts to the left to warn you. Make sure they're
in a straight line so you don't get a concave faces.
Unmark all the verts then start inserting faces. I recommend marking
no more than 4 at time. That way if the face is twisted you can use
Twist Face to fix it instead of Swap Verts. Then join any faces you
need to.
| Also watch the top view to make sure all the normals are
pointing in the same direction- up. |
 |
When you're done it should look like the example to the right. |
 |
Time to EXTRUDE. Before we extrude keep in mind that all the new
faces will be textured the same as the parent face.
Mark the faces and change their texture to LWflr.
You've made sure all the verts are pointing the same way- up.
Mark all the new faces and then pick the Extrude tool and set it to:
'Extrude from Marked Face(s),' 'Extrude along normals,'
5 units, Point Outward.
It' important that you make sure Delete Base Face(s).. is NOT CHECKED.
Now extrude.
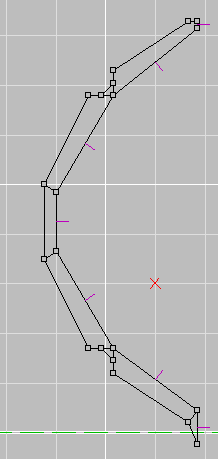
| In the TOP view window your metal frame
should look like mine to the right. As you can see the original faces
are still facing up. They're still marked from the Extrude command
so pick the Face Flip tool so they face down.
Doing a multiple face does 2 things you have to watch for.
One is extra verts the other is double faces. This is because
D3edit still treats each face individualy when you extrude. This
means that at a seam between to original faces a new side face is made
for both. If the original faces were on plane with each other the
2 new side faces will be on the same plane but have there own individule
verts.
So before going any further Remove Extra Verts. |
 |
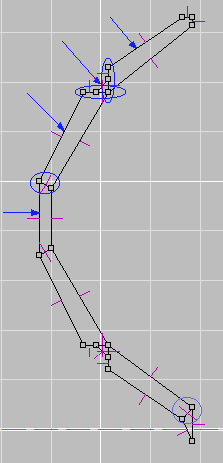 |
To the left I have circled some examples of double faces
created when we did the multiple extrude. Mark and delete them.
The arrows are pointing to some of the faces that will be outside the
shell. Delete all the faces that will be outsie the shell.
When you're finished the frame should look like mine to the right.
Save and go on to the next page. |
 |
On to the next page.
Back to Papacat's main page