
Mark all the verts, set it for 12 sides, normals pointing outward, and lathe around the Y axis. Save your room.
Remember, there's no undo so save often and sometimes with a new name. You can always delete extras when you're happy with the results.

In the next few pages I'm going to walk through building a room using
lathe, extrude, rotate, copy and paste.
You'll see these tools in action and see some techniques for applying
them to make complex structures easy to build.
I'll be rebuilding a room from Vortex1 so you'll have an idea of what
we're trying for.
I'm assuming you have read through Quick Tool Review
and have a basic understanding of how to use the tools
found in to Modify, Face, and Vertex sections of the Room bar.
The idea is to learn the old "Right Tool for the Right Job" concept.
As with anything there's more than one way.
These are some techniques that I've found to be effective.
We're going to build the Vortex room with the windows to the viewports
on either side. I recommend printing this out and following along.
I've also included a zip file containing some .orf's from this tutorial.
Get it from here and open Sctut01orf.
It has the verts laid out and ready to lathe.
|
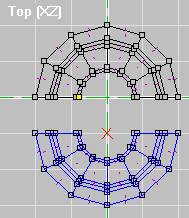
To the left I have laid out the verts I'm going to lathe
creating the sphere. I've also worked the pipes into it. Remember
to always insert verts continuously. You can't pop verts into the
middle of a string; the lathe will be trashed. I went bottom to top.
Mark all the verts, set it for 12 sides, normals pointing outward, and lathe around the Y axis. Save your room. Remember, there's no undo so save often and sometimes with a new name. You can always delete extras when you're happy with the results. |
|
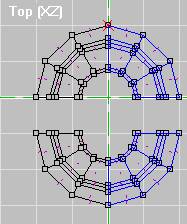
| First mark all the lower half by stretching
a window around it.
Then Copy it. |
Mark them again and delete them. | Now use Paste-On-Top. While the inserted portion is still marked, hit the down arrow on your keypad once to move it 50 units. |
 |
 |
 |
 |
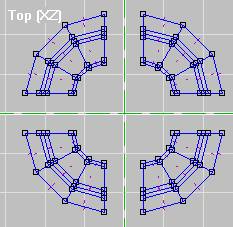
Mark the one half (shown on left), then copy it. Mark
again, delete it, Paste-On-Top, and move it 50 to the right.
I want it to stay centered on zero so change the grid to 5, Mark ALL (M) and move it 25 units left. Your results should look like mine to the right. |
 |
Yoiks!!!! I just noticed the faces or the
wrong way. Hmmmm looking at the previous examples you can see the
normals
are on the outside instead of in....... Oooooops. Mark all and
Flip Faces if your room is also inside out. Anyway.........
|
 |
We'll align the textures later. I just wanted something to give it some depth for now.
On to the next page.

