Check the gunpoints you want ifn this battery. I checked all 4.
Save (export) the .OOF

This tutorial picks up where Custom Objects III left off. Get
the files used in this tutorial
by getting CSTBOT.ZIP
I'm just starting to learn but here's a quick jump start to help you get under way.
When building a robot (or ship) the most important thing to remeber
is the direction you build it facing. Make sure it looking
down the Z axis. In D3Edit when you look in the SIDE(ZY) window
your object should be facing to the right.
Once you have your GUNPOINTS in you need to set up batteries (groupings of gunpoints).
| In D3Tool go to Tools-Edit
Window (same dialog box as for gunpoints) and choose the WBAT (Weapons
Batteries) tab. Click 'Add Battery'. Under 'Gunpoints' you
should get an active check box for each gunpoint.
Check the gunpoints you want ifn this battery. I checked all 4. Save (export) the .OOF |
|
| First I set up the physics so it
would use physics to rotate along with it's normal AI setting so this robot
will use both AI and Physics.
AI is what it uses to aim, shoot, manuever. Next we need to set up Weapon Batteries. This is where we tell
the robot what to shoot, from where, and how fast or often. Open
the Weapon Batteris branch. Leave the aiming setting along.
We need to set up the first (and only in our case) battery so open the
Battery(0) branch.
|
 |
 |
First open
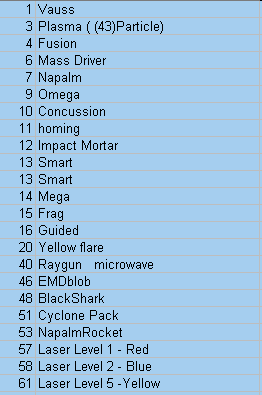
the Gunpoint Weapons branch. Here we assign a weapon to each of the
gunpoints using the weapon index numbers. To the right is a table
to cross reference the weapon to an index number.
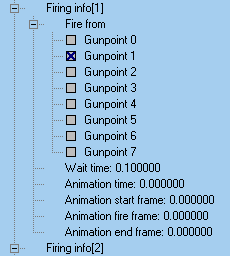
Firing info works in relation to the 'Number Masks'. 'Number Masks' is like a firing sequence loop. 4 masks means the are 4 volleys of fire in each loop. (Figuired out through testing). Think of each Firing Info entry as a volley. To demonstrate this we'll have the first of the 4 volleys shoot from all 4 gunpoints by setting Firing Info (0) as shown to the left. |
 |
| Now set up Firing Info (1), (2),
and (3) as shown to the left with wait time at .1 (one tenth of a second).
Have (1) shoot from gunpoint 1, (2) from gunpoint 2, (3) from gunpoint
3.
These setting will cause a 4-laser volley followed by 3 single-laser shoots, a one second pause (wait time in Firing Info (0)) then repeat the sequence. I you want the bot to hold still for you to see this better, turn off 'Uses Physics' and under AI Settings set the MAx Velocity and Max Delta Velocity to 0.00. |
 |
There's more to come.... I just need to learn it first.