|
Now that you can make a basic shell, let's go for something more complex: layers. You can use layers
for various purposes, but again these primarily include texturing and/or portal containment. However,
they can also include the ability to manipulate verts on your walls to change your shell and create
odd-shaped shells that aren't boxy. You can't do that on a one-layer extrude, because it would make
concave faces. As it is, doing it this way will tend to make some nonplanar faces, but you can fix those
with triangulation. The editor will report exactly which faces have a problem, if you use the verify
function in the File Menu.
------------------------------------------
Picking up with where we left off in
Lesson
One, lets continue with the example room we started there.
It's 20 units tall. Lets take it to 50 units in 3 layers.
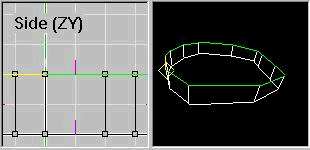
1) The first thing you need to do after completing that first extrusion is to unmark the base face. Switch
to Face mode, and hit U to Unmark All. Next, you need to select the ceiling face. You can do this any
number of ways, including clicking on the Top (XZ) View until it is highlighted, or using the 3D view and
panning around until you can click on the side of the face where the normal is (its belly, in this case --
the side facing down on the rest of the room).
2) You need to mark the ceiling face, which will be the base face for your next extrusion. Then flip that
face so its normal is pointing up, like in the shot below.
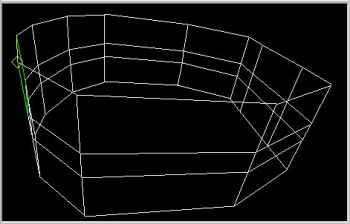
3) Now you are ready to extrude again. Do so, and set the right length for your next layer, then
extrude. NOTE: you can click the box to delete the base face after extrusion. Otherwise you will have to
delete it manually, because it has to go.
4) Repeat steps 2 and 3 for each layer. In this example we are only doing one more layer. NOTE: each
layer means a multiplication of total faces in your room. Two layers is DOUBLE the shell faces of just one
layer. The most layers I have ever done is seven, in a room with 12 faces per layer, so that was 86
faces for *just* the shell (including floor and ceiling). You have to keep an eye on your face count. If it
gets too high, your room will be hard on low-end users, and may even make your level unplayable for
some players.
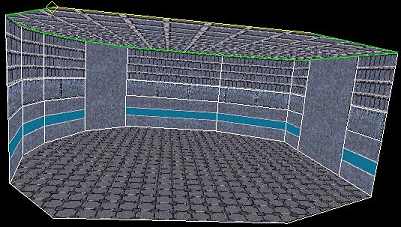
Here's a shot of the finished shell.
Now you've got a layered room. It's a little small, but might serve as a good waypoint between larger
rooms, or as a room off to the side. It's tall enough that you can fill it with a variety of things, including
ceiling lights, a raised platform, an altar (with a power up on it) or what have you.
------------------------------------------
Now you may decide either that you want some vertical stripes to break up the horizontal ones, or that
you want to attach another room not at the top or bottom of a wall, but in the middle. In either case,
you can combine faces to achieve your goal.
Combined faces do NOT ever make T-Joints for you. This is because they do not erase verts, and they
do not combine any edges. The edges shared by both faces will be deleted, but all the others remain
as-is, and this protects the integrity of your shell. So you can freely combine whatever faces you like,
as long as doing so doesn't interfere with other plans you may have.
To combine faces, first be in Face Mode, then make sure no faces are marked. Then select the face
with the texture you want the new face to have (if neither texture will be kept then it doesn't matter
which you choose). Mark that face. Select the other face, then use the Combine Faces (Join Faces)
button on the Room Bar. The new face will remain marked, so that you may combine a whole column of
faces quickly.
Here is a look at our example, with three of the walls combined to allow for portals. Notice that I
textured them differently also. This room could now serve as a hub room leading to three other rooms.
Of course it still needs lights and maybe other dressing, but the shell is done and textured and
error-free.
------------------------------------------
In my Entropy level Siege Maxius, the main room, which sits between the two fortresses, was meant to
have a whopping SIXTEEN portals connecting 16 different rooms to it. That includes 4 Entropy bases, 4
sniper ports, 4 entrances to the red base and 4 to the blue base. To accomplish this, I did a 5 layer
extrude, and I had seven wall segments on the north and south walls, and five segments on the east
and west walls. So that was 24 faces per layer, and 5 layers, for 122 faces in my room when done
extruding. Well I didn't need ALL the faces, I just needed the layers for portal containment, so it was
time to optimize. I had 4 portals going in one layer, 4 more in the next layer up, 4 more in the layer
above that, and I wanted a layer both above and below the portals. So I did my layers, and then I
started combining columns of faces where no portals would be going. Take a look at the shell of the
room, pictured below. This shot was taken using the special "Render Shell Faces" option in the settings
screen, with the nonshell faces unchecked and not displayed. All the lights and fixtures are IN this room,
but only the shell is shown in this view:
Note that on the walls where there will be no portals, I combined all 5 layers into one face. And I
combined a couple other faces, too. So I was able to cut down from 122 faces, to just 58, on the basic
shell, by combining faces where I could, without compromising portal containment.
Look at the pentagonal attachment on the west wall. That's an entropy base, and there is one at each
of those "middle layer" faces on both west and east walls. That's only 4 of the 16 portals, which explains
why east and west have only 9 faces on them while north and south have 15 each. Do you see the
fracturing caused by joining the pentagon face of the entropy base to the larger square face of the main
room? If that entire west wall was just one face instead of that containment structure you see, then
the second portal being attached on the west would be impossible to place with precision, because the
fractures made by the first portal would split the entire wall into a few pieces, and introduce new verts,
and move ALL the normals around so that I could not just hit "Place Room, Attach Room" and be done.
But by designing the wall with containment, then when I go to assemble the level, attaching all the
rooms together is a piece of cake, and I never get mismatched portals. Containment, containment,
containment: it can save your level!
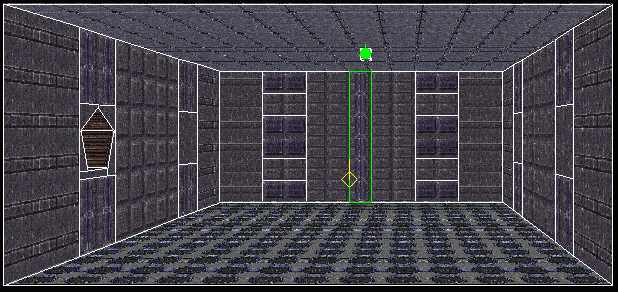
Now look again. Do you see the current face I have selected in the shot? Its outlined in green, with one
small piece of the green outline being yellow. That yellow is the current edge of the current face, and is
proof of the layered Sirian Method I used to make this room. That edge is in the second layer up from
the floor, and it matches an edge on the adjoining face. Like I said, you may be better off to make
layers and then combine faces than to try and make one layer and then split some of the tall faces into
smaller pieces. If you do it that way... you're going to have to fix a lot of T-Joints.
Also note that the current face in that screen shot has containment itself, both to left and right, so
that its buffered between the two columns where the portals will go to the 4 base entrances (in layers 2
and 4). That middle column is where the two sniper ports attach. So that's why I needed 7 columns on
the north and south walls. Column 1 is a buffer, column 2 has 2 portals, in layers 2 and 4, column 3 is a
buffer, column 4 has 2 portals, which are small and rectangular and
don't need to be contained
vertically, but did need horizontal containments, column 5 is a buffer, column 6 has two portals in layers
2 and 4, and column 7 is a buffer. Whew! Lot going on there, but... I succeeded at having 6 portals on
that one wall, with no errors, and I got to do some nice texturing in the process.
Layered extrusion has its uses. This complex room has 16 portals, and its just a box. I dressed it up with
some bridges and fancy lights, though, so it doesn't look quite as bland as the view showing ONLY the
shell. But it was the best example I had of what you can do with layers, and with extruding to make
your shell. Because realize that I did this ENTIRE room without marking and moving any verts at all. Even
the fixtures I made entirely with extrude or lathe, or in the case of certain lights, with manually placing
verts and inserts the faces to make one light, then copy/pasting all the others of its kind from the first
one.
You *CAN'T* have a great room without a great shell. Learn to make great shells, and then you're
halfway there to making badass levels that look as good as (I hope) they play.
The Sirian Method is to rely on smart use of Extrude and Lathe to make your shells. You can do a Hella
lot of things this way, with minimal work, particularly in the area of texture alignment, so that it
proceeds quickly but still looks sharp.
More to come. Next lesson: concave floors.
- Sirian
|