Objective: Learn the fundamentals of making a quality shell using D3Edit. Pre-requisites:
must have D3Edit installed! |
This
is part 1 in a series of in-depth tutorials by Sirian.
Thanks to Sirian for allowing us to post these lessons. |
|
|
LESSON ONE - The Sirian Method - Making a Quality Shell |
||
|
Now, if you are making a large room that is mostly squarish, your shell can be a SINGLE face that you extrude. This is how I make almost all of my rooms. I will typically make the floor, then extrude that, so that both my floor and ceiling are a SINGLE face each, or for concave rooms, several faces. My walls will be broken up, and this is for several reasons. First, it's absolutely VITAL that you have "containment" on any face where you plan to attach another room and create a portal. If you attach a room to your current room and the two faces do not match, the editor will "fracture" one or both faces to make the attachment without creating any concave faces. This is actually very very helpful, but more on that later. When it fractures the face, it is splitting the face up into smaller faces, and this is adding verts TO ALL ADJACENT FACES that get "hit" by the fractures. If you happen to have another portal face adjacent to the face you are attaching to, it may get hit by a fracture, have one or more verts ADDED to it, and create "mismatched portals" -- a very very bad thing. So when you are planning your rooms, you need to plan WHERE you will have your portals, and as a general rule of thumb, you want to create "containment" around any planned portals so that fractures created when attaching rooms will "be intercepted" by "buffer" faces you have between the two portals. For example, say you make a room with a boxy shell. One face for floor, one for ceiling, one for each wall. If you attach a portal to the north wall, in its upper left corner, then you later attach another room to the west wall, in the middle of the face... you are quite likely to have a fracture from that west attachment reach the portal on the north wall, and screw yourself royally. But what you can do instead is to make the west wall actually be three faces instead of one. The "middle" of the three faces is where you'd attach that one portal, then there's a "buffer" between that and the north wall, so that no fractures reach the north wall (or the south). And you've got no mismatched portals to cause you to have to delete and restructure entire rooms. Trust me, I learned this the hard way. Secondly, creating separate walls gives you a place where you can vary the wall textures to create a less bland-looking room. ------------------------------------------ So let's go through the steps of making a shell, with the Sirian Method. 1) You have to select Vertex Mode. The editor starts in vert mode, but if you've already done other work you may be in another mode. 2) Select face you are going to extrude from. For me this is usually the floor, but occasionally a wall. We'll use the floor for the example. 3) Choose the appropriate XYZ view (for the floor, that would be the Top (XZ) view. 4) Get a mental image of the shape of the floor (it has to be non-concave -- you can do concave shapes but that involes multiple extruding from multiple faces). Then get an image in your mind of where you will be attaching other rooms. Then start laying out your Verts on the grid. 4a.) I *STRONGLY* recommend that you use the 3D Cursor (the red X) for all 2D operations. If you use the mouse and click, you will lose control of the depth the cursor is at. If you only move the cursor with the keyboard, you retain complete control of its precise location in the room/level. To use the cursor, you rely on Ctrl plus Arrow keys (or Ctrl plus numpad 2,4,6,8 IF your numlock is off). The cursor will always always always stay on the grid, so you may need to change grid sizes to get it where you want it. And in some cases, you may have to switch between the XYZ views to control the depth as well as height and width. 4b.) So you put the cursor where you want to place your first vert, then you hit the Insert key to place the vertex. Move the cursor to the next location, Insert, move cursor, Insert, etc. This may involve changing grid sizes multiple times, if you are getting fancy. When doing a floor, I recommend you place your verts in a counter-clockwise circuit, so that the face normal will point UP when the face is created. 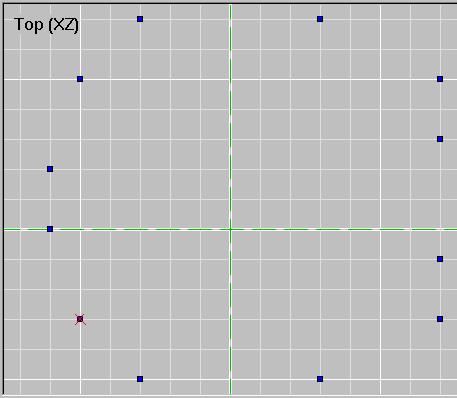 5) After placing all your verts, you are ready to insert the floor face. Use Shift plus Insert to do this. You can texture your floor at this time if you like. 6) You are then ready to extrude. Make sure your face normal is pointing the right way. If not, switch to face mode and Flip the face first. Then extrude from Current Face, Pointing Inward, to whatever height that you desire. Let's do 20, for this example. Note that 20 is the size of all textures. A 20x20 face will match up with a texture. 20x30 will be one and one-half textures, and with some textures this will look bad. So you have to plan your textures with your room shape/size or at least make your texture choices (when you get around to them, if you aren't planning ahead) match up well with the room IF its not all made of neat 20x20 faces (or multiples of that). 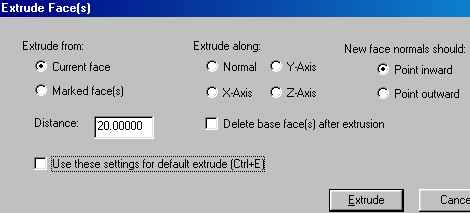 6a.) Note that in D3edit 0.9 you will have to texture each face manually, after extruding. But in newer versions, it will automatically apply your current texture from the texture bar to all extruded or lathed faces, as well as faces you insert manually, so if you pick the texture for your walls before you extrude, they will be done and you'll only have to texture the ceiling or maybe change SOME of the walls to an alternate texture. Texturing as you go is my method... I know some others prefer to build all structure first and texture later, but then the texturing becomes a real chore. Doing some or all of it as you go makes it less bothersome. - - - - - - - - - - - - - - - - - - - - - - Once you extrude, you have a complete shell. If its the size you wanted, you are ready to start work on the things you will put IN the room (lights, fixtures, columns, glass windows, partition walls, whatever). 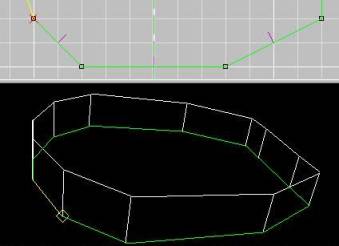 NOTE: you can have walls in the same plane, like on the right of this example room. This is not a concavity. I do this ALL the time, for a variety of reasons which mainly include either texturing or portal containment.  Here is a view of the textured shell. Using the Sirian Method, you can have a basic shell ready and textured in only a minute or two, without moving any of the verts or needing to realign any shell textures later. More to come...
|
||