A Powerup OOF
Here's a cannon I'll use as a powerup.

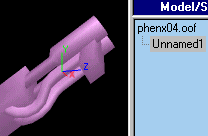
I've finished all my modeling work in D3Edit including textures. The model consists of 6 different pieces brought together but not connected at any of their vertexes.

I've set it up on an angle and have centered it pretty much the way I want it.  I could have adjusted it in OOFEditor but this works to.


When I open it there are 6 sub-models.  I only want one.  Just hold the Shift while you drag-n-drop all the sub-models onto "Unnamed1" (left)
 
This combines them into 
one sub-model (right)
Now's a good time time to remember to SAVE.  There's no undo.  You're best defense from self-inflected wounds is to save often and save multiple copies.
I noticed I didn't get the orf centered correctly before bringing it in.  To the left you see the Pivot Point for the sub-model.  This is where the axis an object rotates upon originates.  It's easy to move.

Pick the Properties tab to see the Sub-Model Properties Dialog.  Click the "Affect Pivot Only".  If you don't, the whole sub-model will move.  Adjust the X axis by clicking the spinner.  You can pick and hold and arrow or hold the spinner arrow down and drag your mouse up or down.  


Once you have the Pivot Point where you want it it's time to add frames, then assign keys to the frames
We first need frames that will contain keys.  In the lower right corner you see the Time Configuration controls.  Leave Start on 0 and change End to2.  You'll see the Frame Marker now reads  '0/2'.  The '0' is the active frame.  The '2' is the total frames available.
Now to add animation keys to the frames.  Animation keys are what tell the sub-models how to move.  There are 2 kinds: Rotational and Positional.  Also refered to as Rotate and Translate.  We're going to be using Rotational keys.
 

First go to the Key Frame Properties under the Animation Tab.  With the frame marker at 0 select the sub-model.  Click on Rotational.   You'll see an oval added to the Frame Bar.  The means the elected sub-model has an animation key in that frame.  Move to Frame 1 and Frame 2 and add a Rotational key to each frame.


Before  going any further, go up to Animation in the top menu and turn on View Trajectory.

Set the Frame Marker on  1.  The Angle is the amount of rotation the object will move.  L/R (left/right) Angle and U/D (up/down) Angle set the axis the object will rotate around.  You can adjust L/R and U/P with the spinners or by dragging the dails.  If you hold down Shift while dragging the dails they move in 45 degree increments.  Typing in a value is also an option.  Set the Angle, L/R Angle and U/D Angle as shown to the right.

Advance the Frame Marker to frame 2 and enter the same settings.  The green tracing you see is the trajectory.  This shows you the path the or 'trajectory' the sub-model is moving on .  Hit Save so we don't lose anything.

Let's play the animation to see what our oof is doing so far.  Push in the button with the Loop drawn on it. (just left of the Time Configuration Controls).  That's the Loop control.  Once you hit Play, the animation will keep looping through the frames.  Hit the Play button.  Your oof should be spinning with the trajactory trails showing.  You can turn them off from the Animation menu if you like.

With the sub-model still selected go to the Propeties Tab and choose Rotate from the drop-box.  When you do, you'll see information about Rotate below it and a place to set the rotation speed.  Set the speed to 2 seconds. SAVE

You're Done.  

Set up a .gam to use this oof in for a powerup.  With the Rotate property set you don't have to script with DALLAS or set Intitial Rotation in the .gam.  Just set the Use Physics flag on in the .gam.  If we didn't assign the Rotate property you would have had to script an event to Play the animation.


[ BACK ]