JUST SAY NO TO BENDING

Here's a quick, simple technique for making tunnels and pipes without the bend command.  Use it and you'll save time and have more control.  It also make texture alignment quicker and easier. Inside nobend.zip, you'll find nobend.orf, the segment shown in step 1 so download it and follow along.

You'll notice I spell out the keystrokes except for PASTE-ON_TOP.  The keystroke are alot faster than all that mouse work.

STEP 1
Make a face and extrude it.  Make the depth the same as what the grid size is.
In this example I have the grid set at 50.  Set the segment on the 0 coord. as shown.
Set it away from the origin based on the desired radious.  I have mine set 300 units from the origin to the inside face.
 
STEP 2

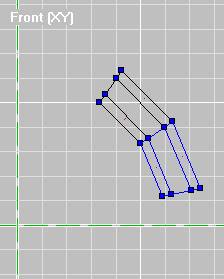
Mark the upper set of verts as shown.
Be sure not to mark the lower ones at any time in steps 2, 3 and 4.

STEP 3

Hit the number '2' on your keypad.  This pulls the verts back to '0' on the grid.

STEP 3

Hit '3' on you keypad 2 times. This will rotate the verts 22.5 degrees (11.25 per hit).  You now have a segment at a perfect 22.5 degres.


STEP 5

This part is to make texturing 100% easier. 

Mark all the verts by hitting 'M'.  Now hit '3' once on your keypad to rotate counter-clockwise. 

This squares you up the grid. This way all you have to do is Reset all the faces to Default UV and they're square with the seems.  If you leave the segment on an angle you'll have to rotate the textures, adjust the scale, rotate the texture...a pain.
Note that if your textures don't  need to align with the face seems you can skip this step.

So take a minute now and align your textures.


STEP 6

While still square on the grid, mark ALL the faces and COPY then Hit:

a) CNRL+R to change to vert mode.
b) M to mark all verts.
c) 1 on the keypad twice to rotate 22.5 degrees to the position shown above.

STEP 7

Hit:

a) CNRL+F to change to face mode
b) PASTE_ON_TOP

Don't waste time un-marking anything.

STEP 8

Hit:
a) CNRL+R to change to vert mode.
b) M to mark all verts.
c) 1 on the keypad twice to rotate 22.5 degrees.

(see where this is going?)


STEP 9

Hit:

a) CNRL+F to change to face mode
b) PASTE_ON_TOP

STEP 10

Hit:
a) CNRL+R to change to vert mode.
b) M to mark all verts.
c) 1 on the keypad twice to rotate 22.5 degrees.
 

STEP 11 

Hit:

a) CNRL+F to change to face mode
b) PASTE_ON_TOP


STEP 12

Hit:
a) CNRL+R to change to vert mode.
b) M to mark all verts.
c) 1 on the keypad once to rotate 11.25 degrees.

Remove the extra verts.  Your done.

Alignment??.... done.  You only had to do 6 faces instead of 24.

Just remeber that 1 and 3 on your keypad rotate you 11.25 degrees.  That means you can only do 90 degrees with 2, 4, or 8 segments.  You canan combine this method with lathe to do other increments.  Lathe a circle; chop out segments that make up 22.5 or 45 degree; texture them; then copy-rotate-paste on top.

[Back to Main]