Adding Lights
Back - Home - Return to Tutorials
|
Note: If you want to follow this tutorial exactly, you will have to finish the one before it, texturing your room, because I will use the room we created there. Though if you are just looking for information about lighting, feel free to look ahead.
|
|
|
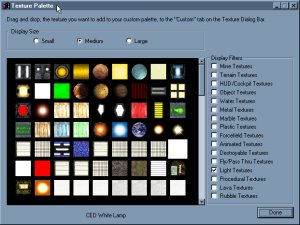
Adding lights to your room is very easy, though making the lights look good can sometimes be very hard. Lights are just a different texture used in D3Edit. You can access these textures by going into your texture list and clicking on the 'Lights' box (You don't have to un-check the 'Mine' box, but it makes the window a bit cleaner.) For now, just put the texture 'CED White Lamp' in your palette.
|
|
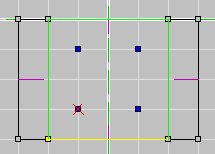
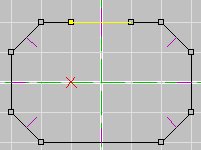
There are two ways to add lights. One way it to just paste them on to your already made room and the other way is to make actual light fixtures. Making the fixtures not only make your level look a lot better, but more realistic. We are going to add a simple light fixture to our room. Start out by making sure all of the views' grid resolution are at 10 and go into vertex mode. Highlight the 'Top (XZ)' mode and place vertices at -10, 0, -10; 10, 0, -10; 10, 0, -30; and -10, 0, -30.
|
|
|
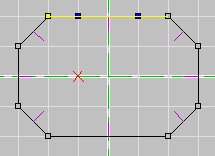
Now, if you notice on the 'Side' and 'Front' view that D3Edit placed these vertexes in the middle of your room, you certainly don't want them there, you want them on the ceiling of your room. We need to move those vertices up to the ceiling, here's how we do that. Without un-marking the vertices, highlight the 'Side' or 'Top' view and press 8 on the Numpad, make sure that Num Lock is on. That should move those 4 vertices up one grid unit. Keep pressing 8 until those vertexes are aligned with the ceiling of the room.
|
|
Now that you have your vertexes in the right spot you can create the face. Go into face mode (Ctrl+F) and hit the 'insert' key. Make sure your normal (the purple lines) is aligned toward the room and not away (to switch the way the normal is pointing, hit 'N' when a face is marked.)
|
NOTE: Oops! The normal of the new face is pointing the wrong way. Fix it by pressing 'N'.
|
|
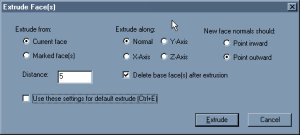
Click on the 'extrude' button and put in these settings: Extrude from current face, Extrude distance 5, Extrude along 'Normal', Normals 'Point outward', and 'Delete base face' should be checked. Double check all of these settings (it should look like the picture to the left) and click on 'Extrude'.
|
|
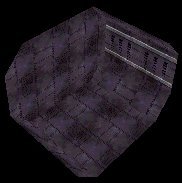
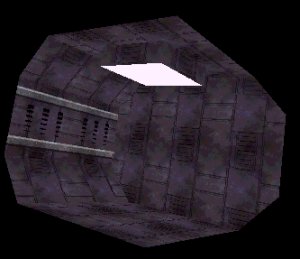
If all went well, you should have a box near your ceiling. The box has no textures though, this is where the 'CED White Lamp' texture comes into play. Highlight the whole box (make sure you are in 'Face' mode) and give the whole box a texture that looks good with your room already, then select the bottom part of the box (going into 3D mode and clicking it a few times usually does the trick) and give it the 'CED White Lamp' texture. We've finished our room!
|
|
|
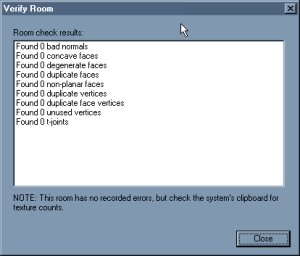
Now that you have finished your room you should see if it has any errors in it. Go to the 'File' menu and click on 'Verify room'. If all went well there should be a clean slate across the whole thing. Congratulations!
|
Back - Continue
Home - Return to Tutorials
|