Building a Simple Room
Home - Return to Tutorials - Continue
The following information is very important to help you understand my tutorials. On the bottom of the D3Edit window there is a toolbar, the four boxes below are the ones you should look for.
 The first box tells you the current grid resolution. The next one is the current coordenents of your mouse cursor. The third one is the coordenents of the little red X which is what you use to place vertices. The last one tells you what your current mode is, in room edit mode, the only two modes you can be in is Vertex mode (Ctrl+R) or Face mode (Ctrl+F).
First we need to create a new room, we will start from the top. Click on 'File' -> 'New', then select 'New room' and OK. The room edit view should appear with a clean area. Mostly we will be working with the 'Front' view in this tutorial so make sure that the grid resolution is set to 10. To set this you right click on the field you want to change (In this case, the 'Front' field) and go down to 'Adjust grid size' and click on 10. Now we should be all set to make a simple room.
|
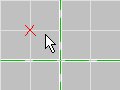
Go into vertex mode (either go to the 'mode' menu and select 'vertex' or hit Ctrl+R) and select the 'Front (XY)' view by clicking on it. Notice when you click on 'Front' again a red X appears where you clicked, that is a marker of sorts, it tells you where a vertex would be placed if you put one there.
|
|
|
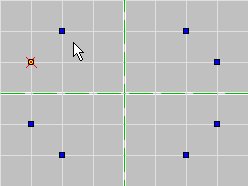
To place a vertex, move the red X to where you want a vertex and hit the 'insert' button. Place vertexes, in this order, at -30, 10, 0; -20, 20, 0; 20, 20, 0; 30, 10, 0; 30, -10, 0; 20, -20, 0; -20, -20, 0; -30, -10, 0. Use the toolbar discussed at the top of the page to help with the coordenents (remember this is in the 'Front (XY)' view.) In the end, you should get something that looks like the picture to the left.
|
|
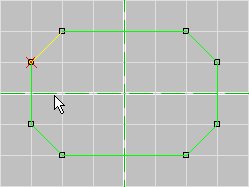
Now that you placed all of the vertexes, you have to switch to face mode to create a face. You can do this by going to the 'mode' menu and clicking on 'face' or pressing Ctrl+F. Once you get into face mode, highlight the 'Front (XY)' view and hit the insert key again. This should create a face that looks like the one in the picture to the left.
|
|
Note: This view may be different for people using older (or newer) versions of D3Edit but is basically the same.
|
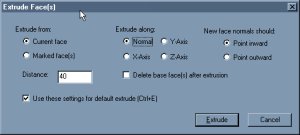
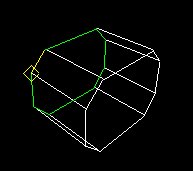
Now that you have a face, we get to use the 'extrude' function. This is one of the handiest features to D3Edit and you will use it quite a bit when you build levels. What it does is copy the current face, and paste it a set number of units away. Then it closes the space in between with other faces. Make sure your face is green (selected) and click on the 'extrude' button. A whole mess of options appears, though all you need to worry about is that 'Extrude along' is set to 'normal', the normals should 'point inward', the 'delete base face' should be UNCHECKED, and that the distance should be set to 40. Double check all of this and then click on 'OK'.
|
|
When you hit 'OK' you will notice that there will be many more lines on your other views, which is exactly what you want. You have created a very simple room in D3Edit! If you wish to save it now you can click on 'File' -> 'Save Room' and name it whatever you wish. I will be using this room file (ORF file) in the tutorials to come.
|
|
Continue
Home - Return to Tutorials
|
|