| The
Bend Tool and the Lathe Tool are great tools that let you be real
creative. You can build spheres, orbs, disks, arches, tunnels, pipes,
structural columns, etc...fast and easy. But when it's time to put on
textures...no matter how you set it, rotate t, turn it...it looks
crooked. You can't make anything line up the way you want it. You end
up rebuilding...trial and error...lot of aggravation...then settling
for less than you meant to achieve. By knowing D3edit's limits for
object and texture rotation and doing 1 or 2 minutes of math before
hitting the bend or lathe button you can save yourself hours of
aggravation and disappointing results. Objective: To insure that textures can be aligned with your bend angles, before you bend. Pre-requisites: D3Edit...how to build a room, extrude
function, bending. |
||
|
Do The Math |
||
First, The 2 Rules about D3edit you have to work with: 1. Objects (rooms, columns, fixtures...) rotate at an increment of 11.25 degrees (360 degrees divided by 32) when you click the 1 or 3 keys in the num. pad. 2. The Texture Align tool turns textures 2.8125 degree increments... this means 32 clicks turns the texture 90 degrees. It's easy to remember: Rotating objects- start at 90.. divided by 2 = 45,..divided by 2 = 22.5,.. divided by 2 = 11.25. Use these increments or any combined total of them to align objects or place them proportionately around room. For textures go 2 steps further... 11.25 divided by 2 = 5.625, divided by 2 = 2.8125. Use these increments or any combined total of them when bending or rotating something to assure that you will be able to align textures. (especially floors and ceiling in tunnels). Now for a refresher course in 7th grade math. Afterward, we'll go through the steps of bending a tunnel. |
||
|
First, the obvious. 360 degrees in a circle. Here's the top view from D3edit ex a. When you bend you start in the first quadrant (QUAD 1). The object will bend counter-clockwise over the axis. This will help you figure out what to set the angle in the dialog box to. Second, 3 formulas for figuring out how far to set the tunnel from the axis: (feel free to say 'duh, no kidding') Circumference = diameter x 3.14Radius = diameter /2 Ratio of the length tunnel to the circumference is equal to the ratio of the bend angle to 360 degrees. The third one is to help keep a certain part of the tunnel "almost" the same size as before you bend it. You can actually bend it from any distance from the axis, at any angle but D3edit will squeeze or stretch the segments to fit it into the arc.
|
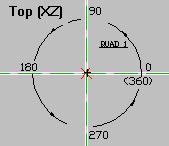 ex. a |
|
|
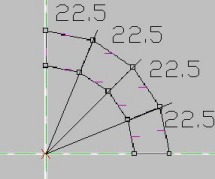
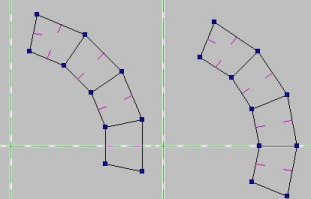
Lets make a tunnel now and see what happens. We'll use an 80 unit tunnel made using 4 - 20x20x20 segments ex b, and bend it 90 degrees. I want to know that the segments' ceilings will allow textures to align before I waste time building this. 90 / 4 = 22.5 .... that's good for textures. It's also good for rotating so I'll be able to turn it into place if necessary ex c. Now... I want the inside wall to stay "almost" the same size so how far from the axis do I put it?
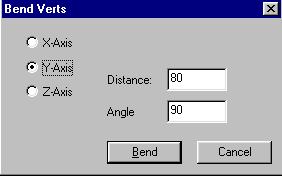
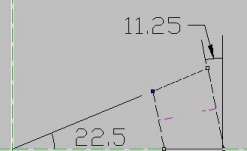
Since D3edit's smallest unit is 1, we'll set the inside edge 51 units from the axis ex b. Open the Bend control panel and set the variables as shown in ex d. Click Bend. Because all the textures got either stretched or squeezed when we bent the tunnel you'll have to use align and set all the textures to "Default UV's". but since we made sure the angles of the segments are possible to hit we'll have no problem turning the ceiling and floor textures until they align with the outer walls. Now watch what happens when you rotate the tunnel. Mark all the vets then hit the 3 key on the num. pad once. The tunnel moves clockwise 11.25 degrees and the segment now sits square across the X axis. Rotate once more and the seam between the segments line up on the X axis. Keep rotating it to see how it behaves. This great if you want to drop in objects like fixtures or columns into the same spot of each segment, all facing the same orientation... like all looking to the center, or down the tunnel as it turns. Just place the object to just outside of where you want it, then copy it again. Use 'Paste On Top', move it into place, rotate the tunnel,.. Paste On Top, move it into place, rotate the tunnel,...... and so on 'till you're done. One last point. Remember what I said about the textures being on 2.8125? That means what ever you are trying to align with. In the case of our tunnel it's the inner and outer walls; not the seams between the segments. If the seams are at 22.5 degrees as with our tunnel, the inside and outside walls are at 11.25 degrees ex f ... just divide in half. |
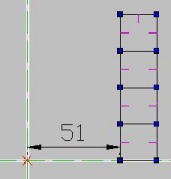 ex. b
|
|
|
Take five minutes to learn this and one minute to apply it and you'll be master of the bend tool and the lathe tool. |
|