| Download the D3Edit files
used in this lesson. |
|
|
Lesson 9 Lathe a Room For this lesson you will need the completed level file from Lesson 8. Open D3Edit and open up your level (thelevel.d3l) The Lathe ToolWelcome back! In the previous lesson we learned how to use the lathe tool to create interior objects. You can now see the potential for using this tool to make dramatic room designs as well. Imagine that the reactor you constructed was a giant room you could fly in (with all the faces pointing inward). The large bell-shaped room in Abandoned was lathed, as was one of the cylindrical tunnels. You can even make a sphere with the lathe tool. You must consider how many faces will result from this...too many faces in a room can cause low frame rates in the game as D3 (and your video card) tries to draw each separate polygon as fast as it can. The possibilities for room shapes are practically
infinite using this tool, but one method is largely overlooked...lathing a 4
sided room. We saw in lesson 7 that extruding multiple faces can enhance
room designs, but we were still left with 2 flat walls, one at each end of the
room. In this lesson, we will create a "square" room that would be
much more difficult to design using the good ol' extrude method. |
|
 ex. a ex. a
|
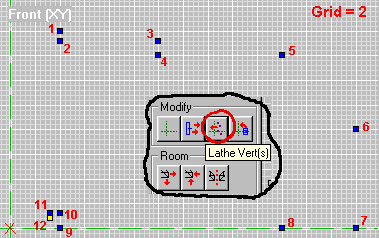
Go to File/New. In vert mode, place the verts clockwise as in ex.
a. Note the distance between the vertical reference line and
the nearest verts. This space will be filled by the end caps.
Save your room! Open the Lathe dialogue. We will extrude around the Y axis,
4 sides, end caps, face normals pointing in. Hit the Lathe button. |
|
ex.
b
ex. c |
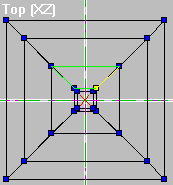
The result is ex. b. Pretty easy way to make a nice room.
But if we want to add other things to our room, or extrude one of the faces we
may have some problems. This is because the room is positioned on the grid as a
diamond, rather than a square as in ex. c. We can rotate it 45 degrees
and straighten it out if we want.
Go to Mark/Mark all, (or use the M key) to mark all verts.
|
|
Make sure that your reference frame is in the
center of your room in the Top pane. With the Top view pane active,
use the 1 and 3 keys on the numeric keypad and rotate the room
until it is even with the gridlines. Now we're all nice and square!
Note: The rotating of verts can also be done after placing the verts but before lathing the room. Our lines are now nice and straight, but we have
a new problem...we're off the grid! Look closely and you'll see that even when
the grid is set to 1, some verts are off of the grid points. We can fix this.
With all verts still marked, click the unnamed button in ex. d. This
snaps the current vert to the grid, and any marked verts are "pulled"
onto the grid along with it. If you verify the room you will find that it
passes the test with flying colors...no concave faces or any other problems.
Excellent!!! |
ex. d 
|
|
You can now texture your room in any way you like.
In the newest version of D3Edit, the texture window is opened by clicking on the
Tx button. If you are using D3Edit 1.0, you may see some strange warping
of faces in the 3D view. This is a bug in the program and is not a problem with
your room. You may also see other changes in this window. This is due to the
newly added outdoor terrain support.
With the new version you may have serious problems using the 3D view when designing a new room. Once the room is added to the level this problem will disappear. You may wish to do your texturing after this step. Adding our room to the level |
|
|
|
|
|
In World View, make current the face where your new
room will be joined ex. f. Now go to our new room, enter face mode,
and mark all faces. Make current one of the four big vertical walls. Obviously
this face is not the same width as the one we selected in the other room. Go
back to World View. |
|
 ex.
g ex.
g |
Go to Room/Place Current Room at Room. By
default, the rooms will be joined at the center of each of the 2 faces. Notice
that our new room is attached at the center of the face you marked. This could
result in our new room, once attached, being off of the grid. This isn't
necessarily bad, but we'll try to avoid it for now. If we could connect at one
of the faces edges, we would be perfectly aligned with the rest of the level -
on the grid. One way to do this is to snap the placed room. |
|
One way to do this is to snap the placed
room. The location at which the room snaps to is dependent on which vertex
is current in the World View. Use the V key to change the vert on the
current face until it is the same as ex. g, then go to Room/Snap
Placed Room. The new room is now placed, but not yet attached.
Again use the V key and select the different verts on the current face
and snap the room again. Try this with different verts and the room will align
itself differently.
Get everything looking like ex. g again and go to Room/Attach Room. Select the new room and open as the current room...we're still on the grid! Yippee! This makes life a little easier. Save your level! The big flat plane with all the dots that you may see (World View) is where outside terrain can be applied. This may obscure the view of your level. Hopefully there will be a fix or a workaround for this soon. Compute the Vis (BOA) and lighting (you did add some lighting textures, right?) and save as an .mn3 file. You are ready to test your new addition!
Here is a view of my version of the level. Hopefully yours looks similar, at least in layout. Looks cool, but kind of empty. My texturing is a little ugly too. You can add weapons the same way we added and moved the player starts. If you feel adventurous, add a few missiles and guns. If you're having trouble aligning your textures, fear not! We will be covering this subject shortly. We will also try to make our rooms more interesting. There aren't many places to hide or duck behind, except for the reactor. There also aren't any alternate routes from room to room. In the next lesson, we will connect 2 of our rooms by using a tunnel with a 180 degree bend in it. That's right, I said bend. The Bend tool is a powerful feature, and one of the most confusing for beginners to learn. But you are no ordinary beginner...you have me! Until then, pretty up your level a little. Put some time into the texturing and maybe add some light fixtures - a box mounted to the ceiling with a light texture applied to one face, for instance, is much cooler looking than just sticking light textures on flat walls. I would be interested in seeing some of your designs. |
|


 ex.
h
ex.
h