| Download the D3Edit files
used in this lesson. |
||
|
Lesson 8 The Lathe Tool and Placing Objects For this lesson you will need the completed level file from Lesson 7. Open D3Edit and open up your level (thelevel.d3l) We left off in the previous lesson with a dark and empty third room. In this lesson we will use the Lathe tool to make a "reactor" in the center of room 3 (the barn). This reactor will also provide some light for our room. After that, we'll add another player starting point. Alright then... If our newest room isn't current and
open in an editing window already, make it so. Zoom out all the 2D panes so you
can see the room by
using the S key while a pane is selected. We'll make a raised platform
for our reactor to sit on. |
||
|
Combining Faces One of the 2 faces must be marked, the other current. In ex. b, the 2 faces that we want to combine are shown. The face that is current is not marked. When you have the faces set up, then open the Geometry toolbar and click the Combine Faces button ex. b. The 2 faces have become one long face. Now we'll join this face with the next one down. Make current the face below the one we just created (below when viewed in the Top pane). The combined face is marked already so all we need to do is click the button again and we get ex. c. ex.
c
ex. d Now extrude this face up 5 units (Y axis)
and you get ex. d. Use the Delete base face... option since the
original face will be hidden after we extrude and we won't need it. Remember, the less faces that D3
needs to draw in a game, the faster the game will run. Go to World View and save
your level. |
 ex. a ex. b |
|
|
The Lathe Tool The lathe is one of the most powerful tools that D3Edit provides. Lathing, as well as extruding (or sweeping), are used regularly in 3D modeling. Many of the terms and functions you are learning can be applied to "real" 3D modeling programs, at least in theory. The lathe takes a set of placed verts and "wraps" them around an axis at a specified radius, creating faces as it goes. Huh? It works similar to a lathe in a woodshop. The best way to learn this is to just do it! Go to vert mode and make sure all verts are unmarked. We should move our reference frame. In ex. e, it is outside and to the right of our room. I like to build things outside of the room, then move them in place when it's finished. This helps avoid confusion by keeping the view less cluttered. Use ctrl-click in the 3D panes to move the reference frame where you would like it. Place the verts as in ex. e from top to
bottom in order! Look at the contour of the finished shape in ex. f
if you're unsure on the placement order. The top view in ex. e shows how
the lathe will rotate the verts around the Y axis at the reference frame. |
||
 ex. e |
 ex. f |
|
|
The distance between the reference frame and the
verts is what determines the radius of the lathe action. Open the Lathe Verts
tool in the Geometry bar ex. g. Set it up as in ex. h. |
ex. g 
|
|
ex. h |
||
|
Most of the options are self explanatory. End
caps: notice how we didn't place the verts on the Y axis. The space
between will be covered by a face called an end cap. If we didn't create
them, there would be a hole at each end of our reactor. Sides: 8 means that from
the top view our reactor will be in the shape of an octagon.
Hit the Lathe button now and you'll see what I mean! A little about texturing and UV's |
||
|
ex. i |
For now, mark all faces, including those of
the reactor, open the Texture toolbar, and click Align. In the Texture
Align window, select Marked face(s) and click the Default UV's
button. This will put every texture in your room at its default size and
position. Be careful when doing this - you may inadvertently reset textures that
were previously moved or stretched the way you wanted them. |
|
ex. j 
|
Ex. j
shows my textured room
with the reactor inside. Notice where I put light textures on the reactor. You
need to do the same...find a light texture that you like (I used the LightCrossing03x
texture) and place it on the same faces as in the example. The only way you'll really know if the color and brightness are
suitable is to fly in your mine and see. Picking a light color that will
compliment the general color of your room is something to consider. I also
applied a dim red light texture to the top of the reactor (not seen in ex. j). |
|
|
Moving the Reactor
In face mode, unmark all faces, then mark all faces on your reactor only. Use the numeric keypad on your keyboard to move the faces in the various 2D panes until the reactor sits flush on top of our raised platform. The arrows on the keys will move the faces respectively, depending on which 2D pane you are currently using. You may need to use all 3 panes to maneuver the reactor onto the platform. Use the gridlines as a guide to get it near the center of the room. When you have it where you want, save your level. At this point you may wish to test fly the level and check the color and brightness of the lights you added. You may need to change the light textures until you find one you like. Don't forget to calculate the BOA and lighting before running it in D3 or your changes will not be visible!!! |
||
|
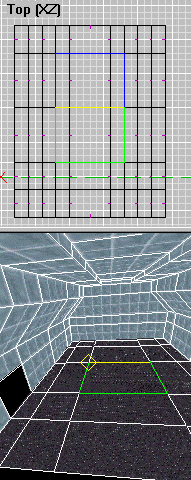
Inserting objects See the green player start in ex. j? Let's add another one, this one in our reactor room. This way you can test your mine with another player without any problems. A player start is added as an object. To insert objects we must be in Object mode - go to the Mode menu and select Object. Click O to open the Object toolbar (ex. k). When we click the Insert start button in ex. k, a player start will be inserted at the point where the red X is on the grid. To move the X,
you can click on the grid and then use ctrl with the cursor keys
to move the X where you want the player
start to be. Use all 3 panes to make sure the X
is inside the room. When you've found a good spot (not too close to the
walls or floor) click the Insert start button. A green dot will
appear...your new player start. |

ex. k |
|
ex. l
|
Now zoom up your 3D view so you can see the start
point up close ex. l. It is "outlined" in white which means
this is the current object. The 2 green lines represent the direction the
ship/object is facing (line with arrow) and its vertical orientation (object upside-down
etc.).
Objects can be moved using
the 8, 4, 6, and 2 keys, and rotated using the 7
and 9 keys on the numeric keypad. My ship in ex. l is facing the
wall. If I select the Top view 2D pane I can use these keys to turn it
around. |
|
|
When your ship is oriented correctly, close the
current room window and save the level. Our original player start seems a
little too low to the floor...in fact it feels like we're in the floor when we
appear there. Let's scoot it up a bit then. In World View, click on the first
room to select it, then right click and Display current room. Make sure
you're in object mode. Since there is only one object in this room, it is
current already by default. Use the 2D panes with the numeric keypad to raise
the player start up a little and position it however you like. When finished,
close the current room and save the level - make a backup copy
while you're at it.
Test The Level Make a .mn3, or use D3Quicktest, and check out your work. If you need to adjust the lights or anything else, go back to the editor, make the changes, and test it again. You will do this MANY times throughout a level build, so get used to it! Notice how the shadows are created from your light textures. Strategic lighting ca add dramatic effects to your level. We're getting into some fairly advanced stuff now. If you've made it this far, congratulations! Go to PXO with a buddy and kick a little butt! If you feel brave, add some weapons to it and a few rooms maybe. Just make sure and save a copy first for the next lesson! In future lessons we will build tunnels and bend them, put in doors, use another method or two to connect rooms, and much more. We will make wind tunnels, add fog and CTF bases as well. |
||


