| Download the D3Edit files
used in this lesson. |
|
|
Lesson 7 Room Shapes: Beyond the Box For this lesson you will need the completed level file from Lesson 6. Open D3Edit and open up your level (thelevel.d3l) Go to File/New... and select New Room. Are we getting tired of building boxes yet? I know I am, so let's do something a little more interesting. We've taken a rectangular face and extruded it into a room, so we can do the same with more complex shapes...BUT...(and there's always a BUT with D3Edit) there are specific restrictions as to what kind of faces Descent 3 will accept without causing problems. One restriction is that there must be no concave faces in your level. Concave Faces
|
|
ex. a
|
"But Schplurg", you might say, "While it is true
that your wisdom runs deep, I KNOW I've seen rooms in D3 that are a hell of a
lot fancier than your ex. a crap! So what gives?"
One way to get around concavity is to divide the face into smaller, convex faces. Let's say we wanted to build a room in the shape of ex. b (which we do). |
|
This face will be one end of a long room, rather than the floor.
Therefore, we will construct this face in the Front pane, rather than the
Top. As you can see this is definitely a concave face. If you trace the edge of
valid a face in a clockwise direction, at every vertex you would either continue
straight, or make a right handed turn. Since ex. b has right and left
hand turns, it is concave.
ex. b Go ahead and create the face
above, placing the verts in a counter-clockwise direction. Placing in this
direction will leave the normal of the resulting face pointing in the direction
we want it. You may use the shift-insert keys, when in vert mode, to create the face once the verts
have been placed instead of going into face mode and doing it. You may want to save
the room at this point. |
|
|
Splitting faces
In order to make this face valid, we will need to split it into several smaller convex faces. This is done by marking the 2 verts between which you would like the split to occur, and using the Split Current Face function ex. c. Mark the 2 verts as shown in ex. d. Notice that these verts are 40 units up from the bottom, or floor. This is no accident - it's the same height as our walls in room 2. |
ex. c  geometry
toolbar geometry
toolbar |
ex. d 
ex. e |
Make sure that the face you want
to split is current, then
click the split current face button. You will
see a new edge between the verts that were marked. The bottom face is 40 units
high - a perfect fit for our connection to room 2! We actually didn't need to
split the face here to help the concavity.
I wanted the doorway, or portal to fit snugly, so that's why we made the extra
split. If you run verify room, you will see that we still have a concave face.
Go ahead and make the remaining 3 splits shown in ex. f and get back to me when you're done :) Note:
Neither of the bottom 2 splits needed to
be made. In designing, we need to consider what kind of
texturing we want in our room, and also where we want our rooms to connect. The way we split up faces will dictate the face
shapes and sizes at which textures must be applied. We planned ahead for the
light strip near the ceiling in room 1, and for its doorway into room 2. Planning ahead is very important in
designing quality D3 rooms and levels. The importance of placing verts
strategically before extruding and lathing cannot be stressed enough. |
ex. f |
|
|
Now we have 5 faces instead of 1. These faces could have also
been built individually and placed together. there are several ways to
accomplish this same task. Also notice the 4 verts at the bottom that are all
alone...we have plans for these as well ;). We are now ready to extrude our
room. If you'd like, you can texture these faces now. That way when you extrude
you wont have that ugly test pattern on all your faces. Make sure not to use a
light texture.
Achieving multiple extrusion :P When you're all set, hit Extrude.
ex. g |
|
|
Hopefully, your screen resembles ex. h. The original faces
are still marked, so go to the Mark menu and select Unmark all. We
are going to extrude again in the same direction, so mark the newest set of 5
faces and make sure the normals point up the Z axis. As you do this you may
notice that there are a bunch of faces inside our room...it's sort of subdivided.
We will need to delete these extra faces later.
|
|
ex. h |
With faces marked, set the extrude for 40 units again and extrude. We couldn't use the Delete base face... option so some unwanted faces are left behind. These are the faces we just extruded from and they are still marked! Select any of the 2D panes and hit the delete key. That will take care of at least some of our unwanted interior faces. We will do 3 more extrusions in the same manner as above with the only variation being the length of the extrusions. Follow the following list - since we made 2 extrusions already, we will start with number 3: 3... Extrude 5 faces 80 units up the Z axis 4... Extrude 5 faces 80 units up the Z axis 5... Extrude 5 faces 40 units up the Z axis |
|
Ex. i
will be the result.
Save your room. You will have a number of
duplicate verts now. Remove them with the bottom button in the geometry
toolbar and save again. |
|
ex. i
 |
|
ex. j
 |
These extra faces can easily be selected in the Front
panel by dragging a box around each layer of faces (the layers run along the
lines that we used to split our original face.)
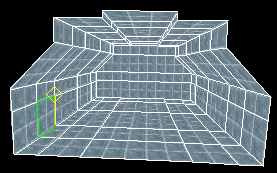
Once finished, we are left with ex. j. Notice the face that is current in this picture...it is 40 x 40 units - the same size as our soon to be portal from room 2! How convenient! Save your room! Another method for creating this room would have
been to split the faces after we did our extruding. This would have saved
us from deleting all of those extra faces. Heh, well now you know. |
|
Portals
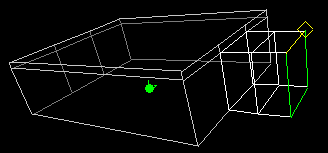
A portal is the point at which 2 separate rooms are joined - a doorway. We created a portal when we extruded room 2 into existence. This time we have the new room already, we just need to stick it onto our level. Having the faces match up perfectly between the rooms we will join will keep our level on the grid. Faces do not need to be identical in order to create a portal, but if they are not, the chances of alignment problems increases. This is not to say that we will be on-grid throughout the entire level - we won't. Placing Rooms Use alt-tab and open the World View window. Ex. k shows where we will attach our new room - make the face current as shown. ex. k Go to the Room menu and select Place Room at Current Room. ex. l The faces are a perfect match. The room has not yet been attached (ex l.) and can be moved, or un-placed using the un-place command if desired. Go to the Room menu and select Attach Room. The room is now outlined in white...it is part of our level! Save your level! Make sure the new room is current and go to Window/Room Properties. Name this room the barn (it kind of looks like a barn...) and close the window. Run Verify mine...perfect
(except for BOA). Run the BOA and save again. We have no light textures
in our new room. We are going to do something a little different for this room
in the next lesson, so for now we will leave it dark. We need to run the lighting again for
the level, since we've added a room. Although there are no new light textures, light
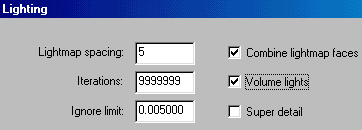
may shine in from the other rooms. Open the Lighting toolbar and set it up as in
ex. m. |
|
ex. m |
In the Entire mine area of
the Lighting menu, click Light It! The lighting may take a little longer
than before since there are now more faces in the mine to calculate.
When the lighting is complete, save
The Level. |
|
Now open the MN3 Packager in the File
menu and save your .d3l as a .mn3. Or if you have D3 Quicktest (recommended) use
that.
You are now ready to test your level in Descent 3! Try it with one other player and see what happens (there is only 1 start point). Hopefully you deleted all of those extra interior faces or you'll see them in the game. The new room will be very dark...you'll need to use your headlight and flares to look around. In our next lesson, we will create some lighting fixtures and use the Lathe tool to make some indoor "objects". |
|


