|
Lesson 2 Building Your First Room Let's get right down to business. I recommend that your screen resolution be set to 1024x768 or higher when you run D3Edit. Some of the menus will be displayed partly off-screen otherwise, which is a nuisance. The higher settings will also provide you with a lot more space to work with. Open D3Edit...go ahead, it's ok! Here is a picture of what you should see (ex. a). I made the window smaller so the pic would fit here, but all the buttons available are shown. ex.
a If there are any menus open on the main screen they can be closed by using the R, T ,P, O, D, S buttons. Go ahead and click them open and check them out if you'd like. The buttons open the following menus: R
- Geometry menu (extruding, lathing, bending...) NOTE: The Texture menu in the updated version of D3edit (1.0) is represented by Tx now instead of just T. Tr is a new button that opens the Terrain menu. C - Camera Slewer (shown open in ex. a...the row of arrows near the top of the screen). These allow you to slide and rotate the views in the editing windows. There are mouse/keyboard shortcuts that are MUCH better and we will be using those throughout the lessons instead. I always have the Camera Slewer closed to gain that much more workspace. Z - Z-buffer...leave button "in" for more accurate rendering (texturing) in the 3d views. There may be a drawing speed trade-off depending on your system. Once you have all the menu bars cleared, we will be ready to begin. Let's
Build!
These numbers are based on the origin, which is the absolute center of the D3Editing world (0, 0, 0). These lines cannot be moved. Right now the green reference lines are hiding the origin. Ctrl-click in any of the three panes until the green lines move. These lines will intersect at this new point, the reference frame. By moving the reference frame, you have exposed the origin, the intersection of the highlighted white lines. Move your cursor over one of the 2D panes and notice that the numbers change from positive to negative depending on which side of the origin the cursor is on. ex.
b NOW look at the next three sets of numbers to the right of the first set. In ex. b these numbers are 10, -10, 0. This is the location of the red X above the cursor. This X is used to designate the coordinates at which a vert or object will be placed. You don't need to memorize this stuff right now, but keep it in the back of your mind - these numbers are important measuring tools. Use ctrl-click to place the reference point back on the origin point, hiding the white lines once again.
Moving Around If you don't have a 3 button mouse, there are alternatives. You can use the left button with ctrl-shift to zoom, or with just shift to pan the view. The arrow cursor keys will also pan the views (see the D3Edit HotKey page for details). The 3D view can be rotated by using ctrl with either mouse button (1 or 3). The Camera Slewer can perform all of these functions, but much slower, and with a LOT more mouse clicks. Using the shortcut keys is the way to go. So are we ready? Then let's do it! Building a Room |
|
ex. c |
We'll start by changing the grid to a smaller size. Go to View/Adjust Grid Size and change it to 2. Notice now when you move the cursor that the X, Y, Z coordinates change in increments of 2 rather than 10. Adjust the size of your panes so that the Top (XZ) pane takes up most of the screen.
|
|
Go to Mode/vertex (or use ctrl+R) to enter vertex mode.
You must be in vertex mode to place or manipulate verts, which is what we are
going to be doing. Click the grid point where the green reference lines
intersect until a red X
appears. Press the Insert key (or use Edit/Insert). A tiny blue square
will appear...this is a vert, or more specifically, a marked vert -
marked because it is blue. Your screen should look similar to ex.
c.
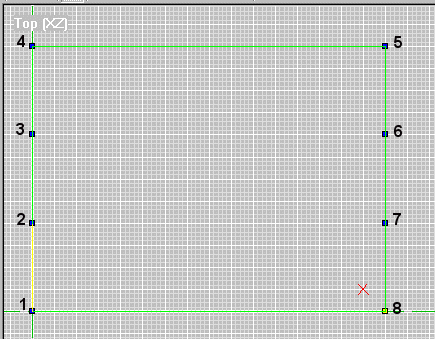
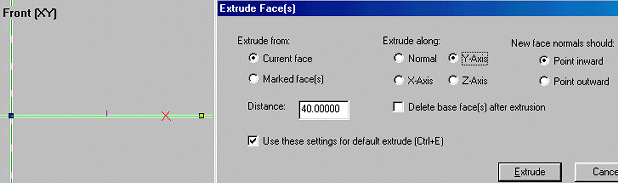
Using the mouse and the Insert key place the remaining verts exactly as in ex. d. Place them in a clockwise pattern and in numerical order (as numbered in ex. d - this is VERY important!). You may need to use the view pan and zoom functions to position the pane so that all the verts will fit in view. If you misplace a vert, just hit the delete key and start again. After you have placed the 8 verts, enter face mode (use Mode/Face or ctrl + F). Press the Insert key. A highlighted green square will appear along the marked verts - this is your first face! The green lines signify that this is also your current face. Notice that all the verts are no longer blue, or marked (not shown in ex d). Your room should measure 160 x 120 units. Since we placed our first vert at 0, 0, 0, this would mean that vert #5 should be at coordinates 160, 120 - verifying the size of the room. ex. d If your face turned out wrong, it can be deleted. In face mode, click on the face until it is outlined in green. Go to the Mark menu and select Mark/Unmark. Now click on the grid, but outside of the face. Notice that the face is now outlined in blue. This means that the face is marked and can be manipulated. Hit the Delete key and watch it disappear. Verts and faces can be marked and deleted, in their respective modes. Faces and verts can also be marked by left-click-holding and dragging a box around all faces or verts you want selected. Ok now let's rearrange the screen so that our face can be seen in all three of the 2D panes. You must click inside a pane before you can move it or edit in it. A pane is selected when the pane "title" is white (the Top (XZ) in ex. c & d and the Front (XY) in ex. b). You can see in the Front and Side views that a short purple line is sticking out of the face. This is the normal and it shows which direction the textured side of the face is pointing. Right click in the 3D view and select Center Current Face. If nothing happens, make sure that the face is selected in the 2D panes (green outline). When you have the face in the 3D view, right click again and select Textured with Wireframe. Use ctrl + left mouse to rotate the face. Note that one side has a colorful texture, while the other is just black. Extrude ex. f The Extrude Face(s) dialog box is shown in ex. f. Fill in the options so that it looks like ex. f. The first option, Extrude From:, is where you select which face(s) you want to extrude. For a face to be current it must be outlined in green. You can also mark one or more faces and extrude from these. We only have one face, so the choice is pretty easy :) Distance is the number of units we want our extrusion to span. Our extruded room will be 40 units tall. This number can be negative for extruding the opposite direction. Extrude Along is the axis along which you want your extrusion to follow. Determining the extrude axis can be tricky for the novice 3D modeler. We made our face using the Top view. The Top view only represents two dimensions, X and Z - X = horizontal, Z = vertical. We don't want to extrude in either of these directions. Since this face will end up being our floor, we know that we need to stretch the room away from this face. The extrude in this view would come towards you and out of the screen 40 units, which is, of course, impossible. Since we know we can't extrude along either axis in this view, and since this view shows X and Z, then by process of elimination we know that Y is the axis to extrude along. To prove it, look at the Front view pane. This shows the X an Y views ex f. We are now looking at the "floor" of our room from floor level. Notice the normal (purple line) is pointing up the Y axis - that's the textured side of the face. We will extrude in this direction in order to make our room. New Face Normals determines which direction the textured side of you face will point. They should point inward so we can see the walls from inside the room once extruded. Delete Base Face after extrusion will delete the face you started with once the extrude is complete. Since our room needs a floor, we'll leave it unchecked. Use Settings as Default can be checked or not, doesn't matter for us. Once everything is set properly, click the Extrude button. The result should resemble ex. g. ex. g Congratulations - you have successfully constructed your first D3 room!!! Save this room now and call it "room1.orf" - you will use this room in the next tutorial. D3Edit has a nasty habit of crashing as of this writing...you can't save too often. If you view the room in the 3D pane as textured, you will see that the room has been "painted" in that butt-ugly multicolored pattern. We will fix this in the next lesson. For now, celebrate the fact that you have
completed you first, albeit simple, Descent 3 room! |
|