| Download the D3Edit files
used in this lesson. |
|
|
Lesson 10 The Bend Tool For this lesson you will need the completed level file from Lesson 9. Bending Open D3Edit
and open up your level (thelevel.d3l) |
|
 ex. a ex. a |
In this lesson we will construct a straight tunnel
and make it turn 90 degrees. Actually we will do 2 tunnels - one bent left and
one bent right - and connect them, making a full 180 degree turn. There is a
slight difference in method depending on which way you bend your tunnel, that is
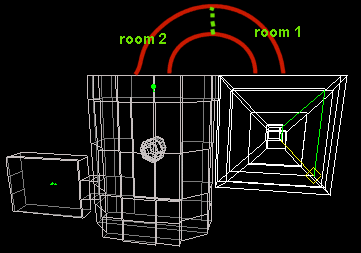
why I want to do a bend in each direction. In ex. a you can see
approximately how the tunnel will be placed. There are actually 2 rooms that
make up this tunnel. Notice how the walls of the two rooms where the tunnel
connects are even with each other? This will make placing our tunnel much
easier. |
|
In this lesson you will have some creativity as to the general
shape of your tunnel. The length and number of segments, however, should match
exactly with my example. We will begin by making the face that will be the
entrance of our tunnel and extruding it. Both of the faces where our tunnel will
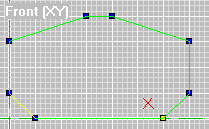
connect are 40 units high...how convenient! Place some verts in the Front
(XY) pane and make a face 40 units high, making sure that it isn't concave.
This will be the mouth of the tunnel. Mine is shown in ex. b. |
 ex. b |
|
Next, we want to extrude this face along the Z axis in 5
segments, each extrude being 40 units. My extruded tunnel is ex. c.
Actually this example shows a lot of important information. You may wish to
do some texturing at this point.
Bend Principles Use ctrl-click to set the reference frame exactly as
shown in ex. c. Mark the top 5 rows of verts. Save your room now.
We will use this file again - so name it straighttunnel.orf. |
 ex. c |
|
Use the Bend button (ex. d inset) to open the Bend window.
We want to bend around the Y axis. This is similar to the Lathe tool in
that we need to determine the axis around which to rotate. The Distance
for a normal bend is the length of the bendable part of your tunnel in units.
For us we have 4 sections marked at 40 units each...4*40=160. Enter 160
in the Distance box. The distance can affect our bend in a lot of
different ways - experiment with these numbers sometime.
The angle is 90 degrees. Enter 90 in the appropriate box. When you think everything is cool, hit the Bend button. Your bend should resemble ex. d, depending on how you
designed your initial face. You did it! And at least some of what we did made sense,
right? Note how the reference frame is at the center of the bend. The bottom
faces stayed straight, just as we planned. |
 ex. d |
|
To complete our 180 degree turn, we will make a matching tunnel
that is bent in the opposite direction. Don't get ahead of me though because
there are a few things you need to know about bending in other directions. |
|
|
Bend Over Now open straighttunnel.orf. Set the reference frame on the opposite side of the tunnel from the first bend that we did, and mark the proper verts as in ex. e. Open the Bend dialogue and select the Y
axis again. We will be bending 90 degrees - fill it in. Now for the weird
part - we need to set our distance to -160 (negative 160). You can leave
it at regular 160 and try it if you like (just don't save - you need to reload
straighttunnel.orf since there is no undo function). You will get a strange
result from this. I'm not going to explain how the distance value relates
to the bend direction, because I don't entirely know. Setting this at different
values will produce some interesting results though. |
|
|
When you're all set, bend the tunnel. Ex. f was my
result. Save this as bend2.orf.
Attaching the Tunnels Make current the vertical face in the room shown in ex. g. Go
to Room/Place Room at Current Room. The purple outline will be added to
the center of this face, which is where we want it. Go to Room/Attach Room. |
 ex. f |
 ex. g |
Notice now that the face you selected in the big
room has been split up into smaller pieces? Zoom in and take a look. This is to
keep the face from becoming concave. This is due to the weird angles of the
mouth of your tunnel (depending on how you made it). Note that all the new faces
are convex (opposite of concave). If you had one big face with a hole in the
middle, it would be impossible for D3Edit to recognize properly.
Ok so now our tunnel is half complete. |
 ex.
h ex.
h |
 ex. i |
 ex.
j ex.
j |
Open room2.orf and mark all faces. This time
we'll make current the face that will connect to our other tunnel end, rather
than the big room it will attach to ex. h.
Now go to World View and make current the face in
ex. i. Use Room/Place Room at Current Room - the 2 tunnels should
align perfectly with each other. If they don't, or if the other end of this
newly placed room doesn't line up with the "reactor room", you've got
a problem. If you used your own tunnel design, redo this lesson using the exact
face that I started with to ensure that your face isn't too wide. If your tunnels look
good. Room/Attach the room. |
 ex.
k ex.
k |
Now only one step remains - we need to make a portal
where the other end of this tunnel connects to the reactor room. This is another
method of connecting rooms.
In World View, make current the big face in the
reactor room that the tunnel will connect to (outlined in red in ex. k).
Go to Room and select Mark Room/Face. Now make current the tunnel
face that will connect to the newly marked face. The result should look similar
to ex. k. |
|
Now go to Room and select Join Rooms.
A dialogue will come up asking if you want to extrude to the center of the base
face, or extrude straight out from the current face. We want the latter, so
select No. Since our faces are lying flush with each other, there
actually wont be any extruding seen.
That's it! The big face in the reactor room was split into pieces just like the first one. Throw some textures in there and add a few lights...run Verify mine...should come up all zero's. Calculate the BOA and run the Radiosity, save as an .MN3, and away you go! The best way to master this function is through experimentation. Try different values in the Distance and Angle settings. Move the reference frame around. IMPORTANT! |
|
