|
D3Edit: The First 5 Minutes When D3Edit became available, it felt to me as if Christmas had come early. When I opened it for the first time, however, my heart sunk. This didn't look anything like Descent Mission Builder 2. Where was the fairly intuitive user interface? Where is my starting cube? Extrude? I shut down the program and vowed to try it again when I had more time. But every time I was about to click the D3Edit icon, I hesitated. It just looked so confusing that I was intimidated. Was the world of game editing going to pass me by, leaving me in the technological dust? Was it really going to be this difficult to create game levels? D3Edit is not a simple program. With it, you can create almost anything imaginable for a D3 level. There is a trade off for such power though. As games become more complex, the methods used for their creation will likewise be affected. This does not mean that you are out of luck, as I found out. Through a lot of hard work, questions, and trial and error, I was able to create my first level, Abandoned. Now I am able to use D3Edit confidently and efficiently, though the road to level creation will always be a bit of a bumpy one. I would like to make the road a lot smoother for everyone else! That is my goal with this set of tutorials - to make your first 5 minutes with D3Edit a little more pleasant and productive than mine was, and to help you create your first Descent 3 level with no prior knowledge of D3Edit or 3D modeling. Don't be afraid - we don't have to open D3Edit yet! We'll get familiar with some terms and such first... If you find the info in this first lesson a little overwhelming, don't worry. We will cover all of this step by step as we build the level. Just give it a good read and use it as a reference guide. Faces
|
|
| So how do
I make a face!?
Ever play "connect the dots"? You know, the puzzle where you connect a series of numbered dots with straight lines in order to make a picture? D3Edit utilizes this concept with a number of its functions, one of which is creating faces. You simply place the "dots", or vertices on the screen and boom - D3Edit connects these "dots" in the order you placed them, creating a polygon, or face. The lines in between the vertices are edges. A face is a series of verts
connected with edges. (ex. a)
|
ex.
a |
| Shell A shell is a term that describes the group of faces that comprise the outer most faces/walls of your level. These are any faces that separate the inside of your level from the outside world (the void beyond the level that you never see in the game). D3Edit will report a bad shell if there is any "leak" in this outer layer - your level must be "airtight". A bad shell can be diagnosed and repaired, as you will see in the later stages of this tutorial set. Normals
Ok, now if the normals are all pointing in, and the textures can only be viewed from one side, then what would happen if we stepped outside the room, turned around, and looked at it from there? Answer: you would be able to see through the wall you had just stepped "through" and would be able to see the inside of your room. Now we'll step back inside the room - whew - 6 solid walls again! Now imagine that we can take your ceiling and flip it upside down. Since faces can only be seen from one side, you would be able to see through your ceiling and fly through it as if it was not there. Your room now has a big hole in it. In Descent 3, a level can not have any holes or leaks. If D3Edit reports that you have a "bad shell", it means that you have a leak such as this in your level, or possibly some other problem as well. NOW...imagine that ALL the walls in your room were backward, or facing out. Your room would be invisible from inside! So let's walk through one of the walls and check it out from outside...whoa!!! It's a solid cube! In fact, we can't even get back in now! Well this is no good as a room, but it is the method used for making interior objects such as crates, barrels or other 3D items. Rooms
Objects
Textures
Modes
Vert mode - place verts on the grid, select, mark, copy and paste verts, move verts across grid Face mode - insert & delete faces, select, mark, copy and paste them, move faces across grid Object mode - you get the idea! Select, move, mark, copy and paste player starts and powerups, etc. Path mode - never mind this for now :) We won't be using it.
|
|
| Views in
D3Edit
ex. b  |
World View
This is the window in which a 3 dimensional view of your entire level can be viewed, either as a wire frame (skeletal) display, fully textured, or a combination of both. The level view can be rotated freely and can be zoomed in and out. World View is where you can add rooms to your level, or remove them. The picture to the left (ex. b) is a World View of my first level, Abandoned. By clicking on any individual room in this view, you can open up a new window with only the room you selected represented. This new window is called the Room View. Notice in ex. b that the big bell-shaped area is outlined in white. This identifies the current room. Now, if I were to select View/Display Current Room View (using the menu), I would see the following (ex. c). |
ex.
c (normals and verts are not shown in pic)
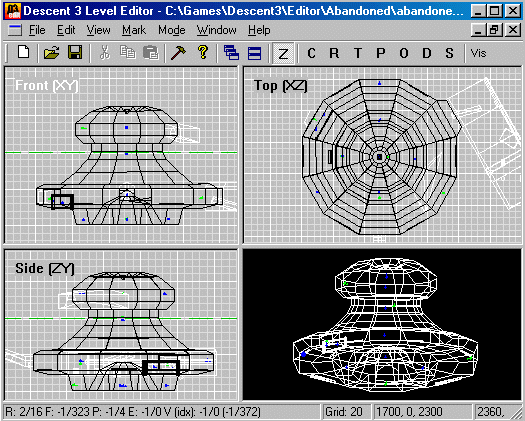 |
Room
View
or Room Editor View. This is where you will do the majority of your work. Room View is where you can create faces, rooms, apply textures, and place objects. There are four separate panes in this window. Three of these panes are 2 dimensional views of the current room - one is a top view, one a side view, and the third is a view from the front of your room. The fourth pane is a 3D view similar to the one in World View, however only the one room is shown, rather than the entire level. The little colored dots in the pic are objects, mostly powerups and player start points. I removed the vertices from view so the room could be seen easier. (Ex. a still has the verts shown). This room looks complicated at first glance, but it actually only took me about 3 minutes to create the main shape. And this was my very first room! |
| The Grid
Notice the grid lines in the front, top, and side panes. The grid is used as a measuring tool and can be scaled up or down, depending on the size you would like it to be. Since we are viewing this room from far away, I have set the grid size to 20 (see text below the 3D view in ex. c). This means that there are 20 units of space across every grid square. If a face is 20 units x 20 units, it would cover one grid square in ex c. Verts can be placed on the grid and linked together to create faces. Once you have a face you can extrude it to create a room. Uh...Extrude?
Axis
|
|
