|
Using Custom Textures
Objective
In this tutorial I will take you step by step through the process of
adding custom textures to your D3 levels.
Introduction
For me, making custom textures is perhaps
the most enjoyable aspect of game editing. They can really give your
designs a unique look. Once you get comfortable with making textures
you can create virtually anything you want. I have used custom textures
to design golf courses for Links 2001 golf sim. Thanks to custom textures,
I have a golf course that winds its way through a city, complete with
skyscrapers, apartments, museums, paved roads, sidewalks. For Descent
3, I created a level inside a house. Custom textures include wallpaper,
carpeting, wood, control panels, book covers. This level (Mad Science)
does not look like a D3 level!
You will need the following
tools for this tutorial:
- Descent
3, full version
- D3Edit version 1.0 or higher
- OGF Tool (comes with D3Edit)
- MN3 Edit (comes with D3Edit)
- Gamtool
or another utility for creating .GAM files
- you will
need a good paint program to make your own textures (Photoshop, Paint
Shop Pro...). For this tutorial I have supplied a premade texture in
case you don't have such a program (yet:)
There
are several steps involved, but it is actually a very simple process.
Let's
Do It
We will get into designing
the actual texture in a later lesson. Right now we're only interested
in how to actually get the texture into the game.
| |
|
|
download
actual TGA
ZIP
includes all files used in this tutorial
|
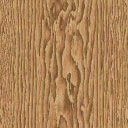
The texture we will use is 128 x
128 pixels in size with a colr depth of 24 bits. You can make
your own texture, or you can download
mine. If you make your own texture, make sure it is a
128 x 128 TGA file. We need a TGA file so that OGF Tool can convert
it into a useable D3 texture (.OGF). The texture is pictured here.
Do NOT use this JPG image! It is a degraded version of the TGA
file that you can download.
I figured since D3 really needs a
beter wood texture that this would be a useful one for people.
It is used in my upcoming level, Mad Science. You are free to
use it in your work if you'd like. Actually, it's a slightly modified
file from a texture library somewhere on the web.
|
| |
|
Ok, we have a 128 x 128 24
bit TGA image. Open the MN3 compiler that came with D3Edit. I have a
shortcut pointing directly to the MN3EDIT.EXE so that I don't need to
open D3Edit to use it, however we will be using D3Edit also. Once you
have the MN3 Editor open, got to the Tools menu and select OGF
Converter.
| |
|
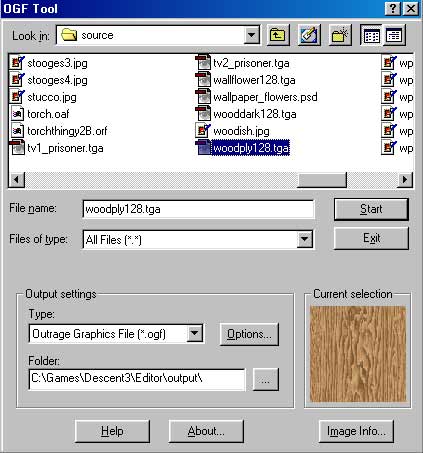 |
In this image you see I have the
woodply128.TGA texture selected in the top window. I like to give
my images detailed names...and yes I have some Three Stooges textures
;)
Make sure that the Output Settings
are set to Outrage Graphics File (*.OGF). By changing the file
types selections you can convert from TGA to OGF or OGF to TGA.
OAF (animated) files are also supported. You can change the Output
Folder if you like.
When everything is set the way you
want it, hit the Start button. Although you will receive
no message stating so, you have just created an OGF texture. Navigate
to your output folder using the top menu and find the woodply128.ogf
file you just created. Make sure the File Types box says
All Files or OGF. Click on this file once and it will appear in
the little texture preview window. If you see the wood texture,
you did it correctly :) Now all we need to do is get this sucker
into your level!
|
| |
|
In order to use this file
in a level, and see it in D3Edit, we need to create a few more files.
| |
|
 |
The GAM File
The GAM file tells Descent 3 that there is a custom texture
being used. You can also add custom sounds and objects to levels.
They must all be listed in the GAM file or D3 will not use them.
Open GAMTool. If a new window
isn't already open, got to File/New. Under the Edit
menu, select New Texture (note the other choices you have
while you're there!). Now double-click the new entry so that you
can type, replace the words "New Texture" with "woodply128",
or something descriptive. I like to use the actual filename here.
Hit the Enter key to complete the change.
Now click the little '+' sign and
expand the listing (see the image to the left). Where it says
File name, type woodply128.ogf, or whatever you named your
OGF texture. Make sure to type it exactly the same as the filename
and to add the file extension...this is where the image file is
called from in the game. Again, use Enter to complete the change.
Now find the '+' sign next to the
word Flags and expand that selection. Make sure that the
"Mine" box is checked and all others are unchecked.
This tells D3Edit to display your texture in the Mine Textures
section of D3Edit's texture library. This is the default selection.
You can see in this image that you
have many options, such as Fly Through and Pass Through. These
will let players fly and shoot through your texture. Other settings
are not as simple and require other settings for them to work.
Save you GAM file file to your hard
drive as texturetest.gam. The GAM file MUST have the same
file name as your MN3! This is extremely important. We don't have
an MN3 file yet, but we will shortly.
Next step...
The MN3 File
The MN3 file is usually the file you use as a finished, playable
level. But the MN3 format is also used by D3Edit so that custom
textures can be seen in the editor.
|
| |
|
 |
Open the MN3 editor. Use the Add
Files button and find your texturetest.gam file and your
woodply128.ogf file.
You don't need to do anything else
in here. Save the MN3 as texturetest.mn3 (same name as the GAM
file).
Now it's time to use our texture!
|
| |
|
Using The Texture
Open D3Edit. Don't do anything else yet! In order for our texture
to be seen in D3Edit, we must tell D3Edit where it is. That is why we
created the GAM and MN3 files.
Go to the Data menu
and choose the first selection, Tablefile Manager (our GAM file
is a tablefile). There are 3 rows of buttons. Click the File Browse
button in the Mission Tablefile (optional) row. Find your GAM
file and hit ok.
Next, go back to the Data
menu and use the second selection, Configure a Mission Hog. Click
the change button and browse to your MN3 file. Select ok. A dialog
will pop up, just hit the ok button and continue.
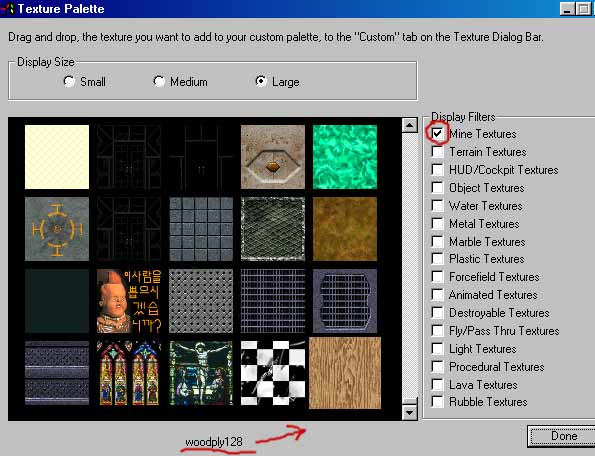
Now open D3Edit's texture
palette, select Mine Textures, and scroll all the way to the bottom
of the list. You should see a wood texture as the very last one. If
you see a static texture then you did something wrong. If you see niether
static nor wood, sometimes the new texture is in the next row of textures
down, even though you scrolled all the way to the bottom. Select to
view textures in a different size and it will appear. It's a "scrolling"
bug in some versions of D3Edit.
You can now use your new texture
just as you would any other!
| |
|
 |
One More Step!
When you build your D3L and wish to try your textures in the game,
you must load your GAM file and all of the OGF texture files into
the final MN3. This is done using the Add Files function
in the MN3 editor. Then add your D3L (level) file as you normally
would and save your MN3 with the same name as your GAM file!
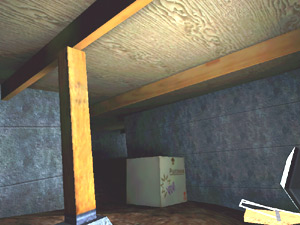
Put
the MN3 in your D3\missions folder, play your level and check
out your new texture :) Here is a shot of the texture in my level
Mad Science. I used the texture that comes with D3 (the one with
wood and a metal frame) for the support posts. The metal on this
texture looks cool where it connects to the cement.
|
| |
|
Very important notes:
- You must load the GAM and MN3 files
into D3Edit EVERY TIME you edit your level! If you don't and you save
your level, all the custom textures will become static and must be
re-applied.
- The GAM file MUST have the same file
name as your MN3!!!
- Every texture you add must have an
entry in the GAM file.
- Textures can be 32 x 32, 64 x 64, 128
x 128 and 256 x 256 and up to 32 bits.
- Using too many large 256 x 256 textures
can slow up video cards. It's important to consider the size of the
surface that the texture will be applied to when deciding on its dimensions.
Final Words
In future tutorials I will get into some methods of creating your
own textures. I'm not an expert, but I've learned a lot and have some
tricks I think are worth sharing. I love doing textures, I wish I could
make a living at it. If you want to see how much textures can change
the look and feel of a level, download the level Mad
Science. As of this writing it is in beta testing but, there
are several screenshots at this link.
Have fun with texturing and
use your imagination. You may never use stock D3 textures again!
- schplurg
|

