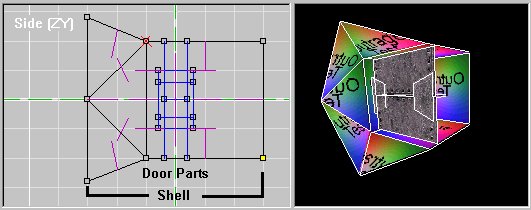
First, build and texture your door and its shell in D3Edit (The shell textures don't matter yet; you'll be able to change them after you add the door to your level). When building the door, make sure that parts you will want to move do not share any vertices with the shell or any other moving parts. Arrange the door's parts so that the door is closed and is halfway between the front and back of the shell, because D3 seems to "fix" doors that aren't at the halfway point.
(The odd shape is for the purpose of being able to tell the front of this door from the back.)
Now choose a face on the shell to be the door's front face. This is the face that D3Edit will use as the attach face when you place and attach the door into a level. Select this face, mark it (and only it), select "Edit->Cut", and then "Edit->Paste On Top". The face is now in the same place it used to be, but it no longer shares any vertices with the surrounding faces.

Save the room. Now go into OOF Editor and open it. Make sure the shell, the front face, and all the moving parts got assigned to separate submodels. Name the submodels if you wish.
Select the shell submodel, click on the "Properties" tab, and select "Shell" from the "Properties" pull-down menu. Now select the front face submodel and in a similar fashion set it to "FrontFace."
Now for the fun part. If the slider down in "Animation Controls" isn't at 0, put it at 0. Decide how many additional keyframes you want the door to animate through and set "End:" under "Time Configuration" to that number. (The "Animation Length:" value only affects the animation speed in OOF Editor -- it does not affect how quickly your door will open/close in D3.) For this example I'll do a simple "Locks-Slide-Apart,-Door-Slides-Open" animation organized as follows:
Frame 0: Door is fully closed.
Frame 1: Locks have moved out of the way; Upper and lower door halves have not moved yet.
Frame 2: Upper and lower door halves have opened; locks are still out of the way. Door is fully open
So I set "End:" to 2.

Now you can start setting animation frames for your door's various submodels. Select one of the "moving parts" submodels and click on the "Animation" tab. For each keyframe, if a submodel starts moving, stops moving, changes speed or direction, or changes the rate at which it is turning, you must select both "-Positional-" and "-Rotational-" under "Key Frame Properties." (If you don't select both of those, your door may pop open instantaneously in D3 instead of animating open.) If that didn't make sense, look at the example and it should. I'll start with the submodel called "LockRight."

In the above image, I've selected "LockRight." The animation is at keyframe 0. By keyframe 1 I need this submodel to be out of the way, so it needs to start moving now, and so I select "-Positional-" and "-Rotational-."
Then I move the animation slider to keyframe 1. While I'm at keyframe 1, I select "-Positional-" and "-Rotational-" again and move "LockRight" 4.00 units out of the way along X.

At keyframe 2, "LockRight" does nothing. It's still off to the side, but it did not move between keyframes 1 and 2. I leave "-Positional-" and "-Rotational-" unselected.

I follow a similar process for the submodel "LockLeft."
The submodel "DoorUp" does not start moving until keyframe 1, so I leave its keyframe 0 as it is. I don't even bother to take a picture.
At keyframe 1 I select "-Positional-" and "-Rotational-":

And at keyframe 2 I select "-Positional-" and "-Rotational-" and slide the submodel up 9.00 units.

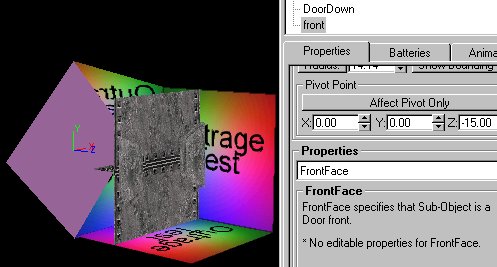
I follow a similar process for the submodel "DoorDown."
That's it for the animation part. Click the play button down in "Animation Controls" and make sure your door is doing what it's supposed to be doing. Now save the .oof file.
Now we need to set up the table file entry and get
the Door into D3Edit. The current version of D3Edit will not let you
add new doors, but you can replace existing doors. Open up D3Edit and
pick a door you will not be using in the level (or the mission, if
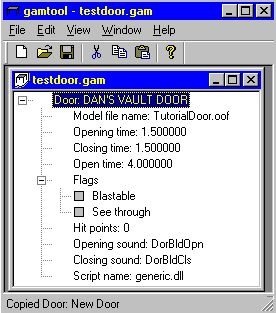
you're building more than one level). Now open up Gamtool
and create a door page with the name of the door you just picked. The
values to fill in should be fairly self-explanatory. (I'm not sure if
"script name:" necessarily needs to be "generic.dll", but I'm not going
to bother finding out.)
The easiest way to get the door into D3Edit is to pack the .oof and .gam into an .mn3 file. You can use whatever hog-making program you like, but here's how to do it with Outrage's HOG Utility (available from Planet Descent; look for "HOG Command Line Utility (Win32)"):
hog -a doordata.mn3 testdoor.gam
hog -a doordata.mn3 TutorialDoor.oof
Of course, you should substitute the file names you used in place of the ones given. Call the .mn3 file whatever you like as well.
Now go back to D3Edit. If any levels or rooms are open, close them. If the door you're replacing is selected as the current door in the door toolbar, select a different door before continuing. Now select "Data->Configure A Mission Hog", click on "Change", and open the .mn3 you just made. Click "OK" on both the "Mission Hog Configuration" window and the friendly reminder. Now select "Data->Tablefile Manager" and click "Hog Browse" on the "Mission Tablefile (optional)" row. You should see your table file listed. Select it and OK your way back to D3Edit.
And that's it. You should now be able to select your door and add it to your levels. Don't forget to add the .oof and the renamed-to-match-your-mission-filename .gam when you package up your levels into .mn3s.